1. Ledge in Endodontics
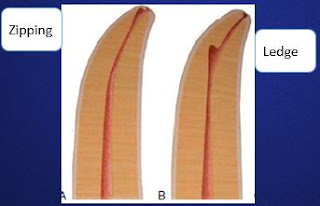
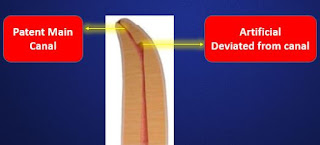
The Glossary of Endodontic Terms of the American Association of Endodontists defines a ledge as “an artificially created deviation of the root canal wall that prevents the passage of an instrument to the apex of an otherwise patent canal".
 |
| Ledge in Endodontics |
Etiology
According to Jafarzadeh and Abbott, the common 14 causes for ledging of a canal are as follows:
- Not extending the access cavity sufficiently to allow adequate access to the apical part of the root canal
- Complete loss of control of the instrument if the endodontic treatment is attempted through a proximal surface cavity or through a proximal restoration
- Incorrect assessment of the root canal curvature
- Erroneous root canal length determination
- Forcing and driving the instrument into the canal
- Using a noncurved stainless steel instrument that is too large for a curved canal
- Failing to use the instruments in a sequential order
- Rotating the file at the working length (i.e., overuse of a reaming action)
- Inadequate irrigation and/or lubrication during instrumentation
- Overrelying on chelating agents
- Attempting to retrieve broken instruments
- Removing root filling materials during endodontic retreatment
- Attempting to prepare calcified root canals
- Inadvertently packing debris in the apical portion of the canal during instrumentation (i.e., creating an apical blockage)
Identification of Ledge Formation in Endodontics
One may get suspicious that ledge has been formed when there is:- Loss of tactile sensation at the tip of the instrument
- Loose feeling instead of binding at the apex.
- Instrument can no longer reach its estimated working length.
- When in doubt a radiograph of the tooth with the instrument in place is taken to provide additional information.
Prevention of Ledge Formation
- A preoperative radiograph is taken to assess and anticipate unusual root canal curvature.
- Patency of the canal should be maintained throughout the cleaning and shaping procedure.
- Recapitulation with smaller instruments in between each change of instrument is the recommended method to prevent ledge formation.
- Work passively without forcing the instruments into the canal.
- Never force an instrument apically. If resistance exists, confirm whether there is blockage due to other causes.
- Work sequentially by increasing the sizes of instruments without jumping to large numbers.
How to Manage Ledge?
Using Hand Instruments
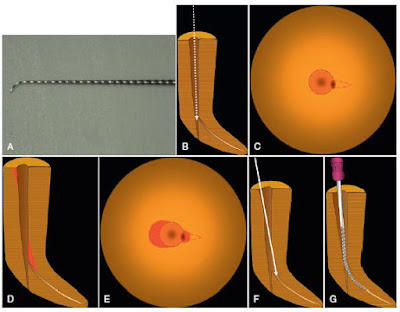
Precurving of a #8 or #10 hand file is a critical step in bypassing a ledge. The small file should have a distinct curve at the tip (that is, in the radicular 2 to 3 mm). This file should be used initially to negotiate past the ledge and explore the original pathway of the canal to the radicular foramen.
A rubber stopper with a directional indicator is valuable in this situation because the indicator can be pointed in the same direction as the bend placed in the instrument
A slight rotation of the file combined with a “pecking” motion can often help advance the instrument to the full working length of the canal
Whenever resistance to negotiation is met, the file should be retracted slightly, rotated, and then advanced again with the precurved tip facing in a different direction. This action should be repeated until the file consistently bypasses the ledge.
In some cases a longer instrument is required to reach the ledge present in the radicular third of a long canal.
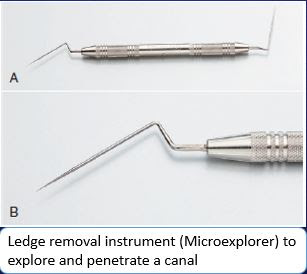
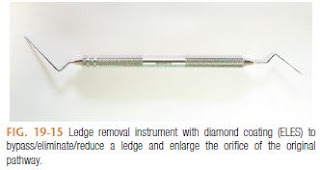
The microexplorer is used to explore the original canal and penetrate a narrow canal beyond the ledge, while the ELES is used to reduce the ledge as the tip portion is coated with fine diamond particles. They can be used in sequence to reduce or remove the ledge.
Using Ultrasonic Tips
Small diameter ultrasonic tips improve visibility with the added benefit of reducing the need for sacrificing sound dentin in bypassing or removing the ledge.The only drawback to the thinner tips could be that they are more prone to fracture during ultrasonic activation.Therefore, thinner ultrasonic tips should be activated in a pulsing fashion at the lowest possible power setting to prevent fracture and heat generation.
Using Rotary Instruments
Pre-curved rotary PathFiles are also beneficial for negotiating past a ledge. First the radicular 2 to 3 mm of the #13 PathFile is precurved at 30 to 45 degrees and is rotated at 100 rpm or slower as it is brought slowly into the canal and moved radicularly.
If a ledge or sharp radicular curvature is encountered, the instrument is withdrawn about 1 mm and immediately reinserted.
This allows the precurved tip to move to a different orientation within the canal as it is reinserted. This may require one or two withdrawals and re-insertions to negotiating the original canal.
This procedure is followed in sequence by the #16 and #19 PathFiles to preliminarily enlarge the original pathway and reduce the ledge prior to the conventional root
canal preparation with NiTi rotary instruments.
2. Zipping in Endodontics
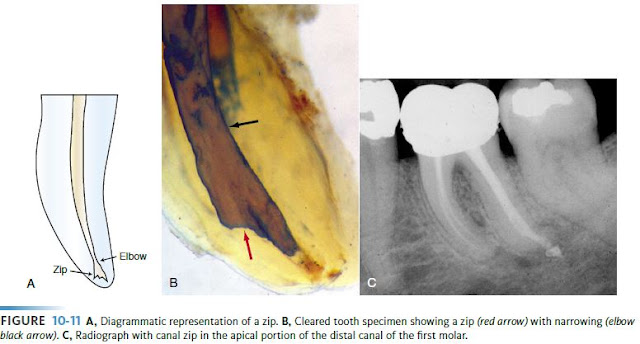
Zipping in endodontics is defined as the apical transportation of a curved canal caused due to improper shaping technique.
Key Point- Ledge can occur anywhere in the canal but zipping is occurred at apical third of canal without the transportation of apical foramen.
 |
| Zipping in Endodontics |
Elbow is the narrowest portion of the zipped canal. A zipped canal is apical to elbow and usually obturation ends at the elbow
Etiology
Failure to precurve the files.
Forcing instruments in curved canal.
Use of large, stiff instruments to bore out a curve canal
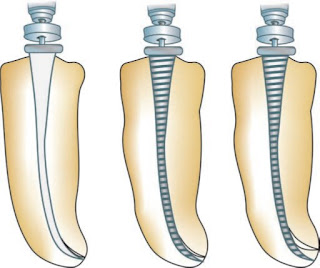
File placed in curved canal cuts more on the outer portion of the canal wall at its apical extent, thus causing movement of the canal away from the curve and its natural path.
When a file is rotated in a curved canal a biomechanical defect known as an elbow is formed coronal to the elliptically shaped apical seat. This is the narrowest portion of the canal
In many cases the obturating material terminates at the elbow leaving an unfilled zipped canal apical to elbow. This is the common occurrence with laterally compacted guttapercha technique
Use of vertical compaction of warm gutta-percha or thermoplastisized gutta-percha is ideal in these cases to compact a solid core material into the apical preparation without using excessive amount of sealer
Prevention
Use of precurved files for curved canals.
Use of incremental filing technique.
Use of flexible files.
Remove flutes of file at certain areas, e.g. file portion which makes contact with outer dentinal wall at the apex and portion which makes contact with inner dentinal wall
especially in the mid root area.
By over curving in apical part of the file especially when working for severely curved canals.
3. Apical Canal Transportation in Endodontics
“Apical canal transportation is moving the position of canal’s normal anatomic foramen to a new location on external root surface”
Key Point- Don't Confuse Apical Canal Transportation with Apical Perforation
How does canal transportation occur?
Following are the risk factors for canal transportation:
1. Improper access cavity preparation.
2. Operator related factors.
3. Degree and radius of canal curvature: When there is smaller radius and greater degree of radius, chances of
transportation is more.
4. Insufficient and improper irrigation.
5. Use of stiffer instruments above No.20 files.
6. Various techniques of biomechanical preparations.
7. Different Alloys used for manufacture of shaping instruments.
8. Crossection of instruments
9. Instruments with sharp cutting tips
10. Improper interpretation of radiographs for canal curvature
Undesirable outcomes after canal transportation:
1. Loss of apical resistance and fluid tight seal due to straightening of the curved canals.
2. Elbow formation or reverse apical shape formation
3. After transportation at the apex, there is formation of elliptical shape. It also gives an hour glass appearance,
tear drop or foraminal rip. These greatly affects the apical seal when obturated using lateral condensation
4. A perforation of the apical part of root canal while using rotary instruments with sharp cutting tips
Types of Apical Transportation
Apical transportation can be categorized into three types
Type I: It is minor movement of physiologic foramen. In such cases, if sufficient residual dentin can be maintained, one can try to create positive apical canal architecture to improve the prognosis of the tooth
Type II: Apical transportations of Type II show moderate movement of the physiologic foramen to a new location. Such cases compromise the prognosis and are difficult to treat. Biocompatible materials like MTA can be used to provide barrier against which obturation material can be packed.
Type III: Apical transportation of Type III shows severe movement of physiological foramen. In Type III prognosis is poorest when compared to Type I and Type II. A three dimensional obturation is difficult in this case. This requires surgical intervention for correction otherwise tooth is indicated for extraction.
You can further read about Role of root canal instruments on apical transportation in article given by Dr Dayananad Chole
4. Stripping or Lateral Wall Perforation in Endodontics
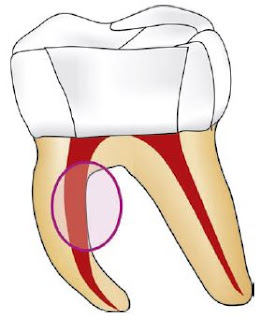
“Stripping” is a lateral perforation caused by over-instrumentation through a thin wall in the root and is most likely to happen on the inside or concave wall of a curved canal such as distal wall of mesial roots in mandibular first molars.
 |
| Strip Perforation |
Stripping is easily detected by sudden appearance of hemorrhage in a previously dry canal or by a sudden complaint by patient.
Management
Successful repair of a stripping or perforation relies on the adequacy of the seal established by repair material.
Access to mid root perforation is most often difficult and repair is not predictable. Mineral trioxide aggregate (MTA) or Calcium hydroxide can be used as a biological barrier against
which filling material is packed.
Prevention
 |
| Prevention of Strip Perforation |
Use of precurved files for curved canals.
Use of modified files for curved canals. A file can be modified by removing flutes of file at certain areas, e.g. file portion which makes contact with outer dentinal wall at the apex.
Using anticurvature filling, i.e. more filling pressure is placed on tooth structure away from the direction of root curvature.
Excellently explained
ReplyDelete